OpenFeign—У┐юуеІУ░Ѓуће
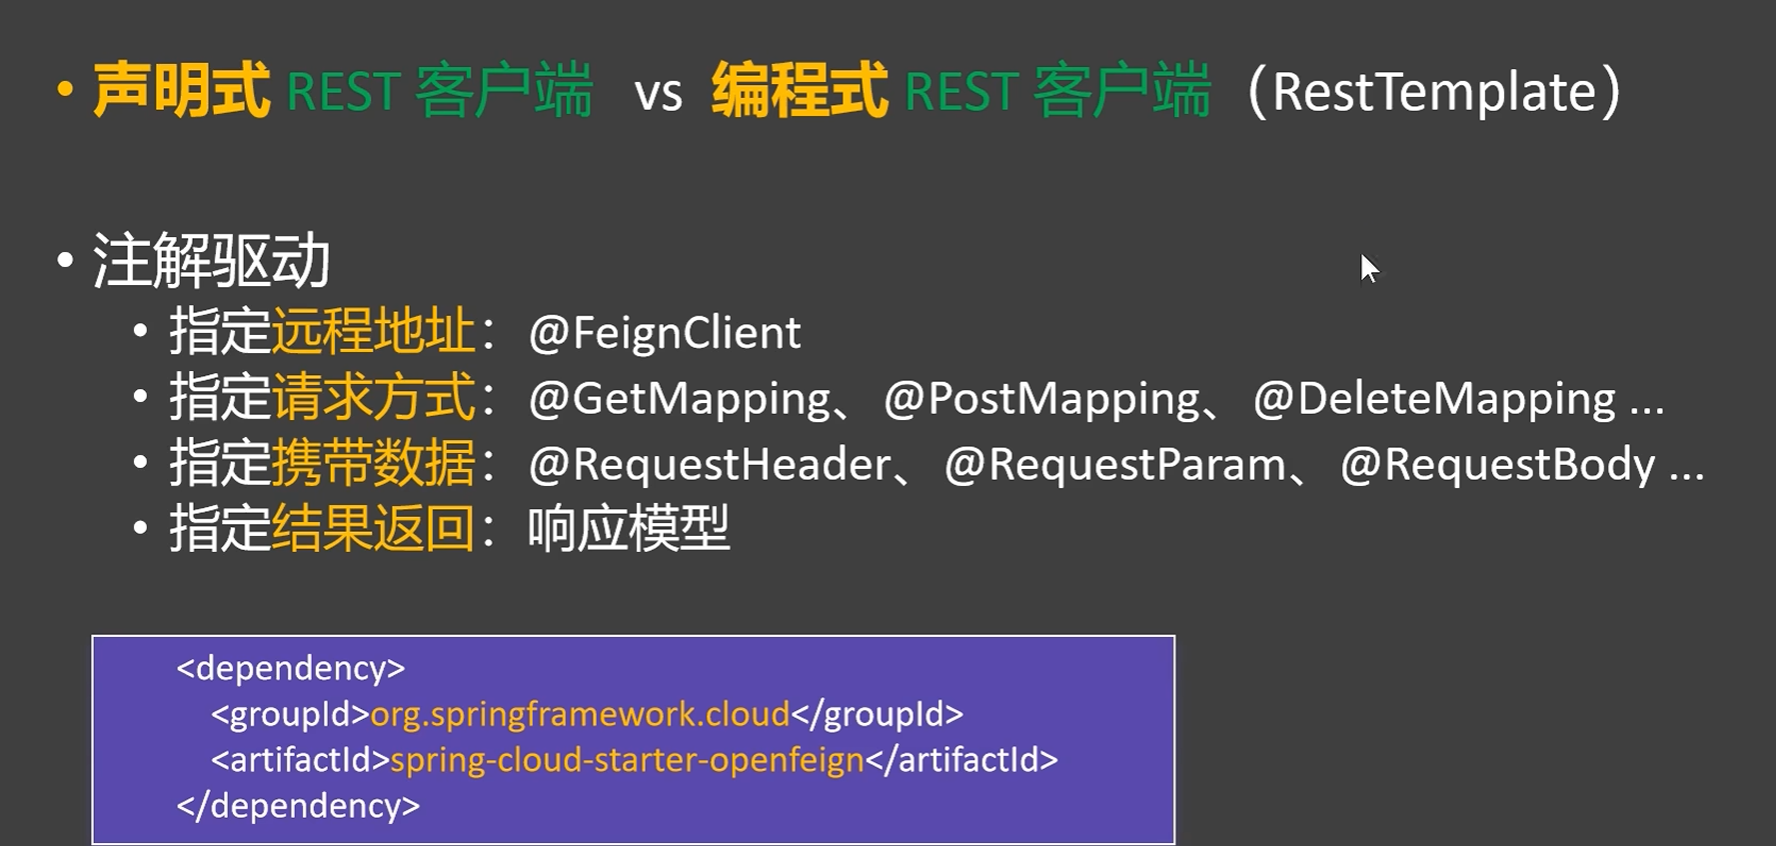
Сй┐ућеOpenFeignУ┐ЏУАїУ┐юуеІУ░Ѓуће
тљЉуггСИЅТќ╣тЙ«ТюЇтіАAPIтЈЉжђЂУ»иТ▒ѓ
т░ЈTips№╝џтљЉУЄфти▒уџёСИџтіАAPIтЈЉжђЂУ»иТ▒ѓуЏ┤ТјЦтцЇтѕХт»╣Тќ╣СИџтіАControllerт▒ѓТќ╣Т│ЋтЇ│тЈ»
тЅЇжЮбСй┐ућеуџёТў»restTemplateУ┐ЏУАїУ┐юуеІУ░Ѓуће№╝їСйєТў»Сй┐ућеrestTemplateУ┐ЏУАїУ┐юуеІУ░ЃућеТ»ћУЙЃж║╗уЃд№╝їУ┐ЎжЄїТѕЉС╗гСй┐ућеOpenFeignТћ╣тєЎС╗БуаЂ
т»╝тЁЦСЙЮУхќ№╝їтѕЏт╗║ProductFeignClientТјЦтЈБ
1
2
3
4
|
        <dependency>
            <groupId>org.springframework.cloud</groupId>
            <artifactId>spring-cloud-starter-openfeign</artifactId>
        </dependency>
|
 1
 2
 3
 4
 5
 6
 7
 8
 9
10
11
12
13
14
15
16
17
|
restTemplate
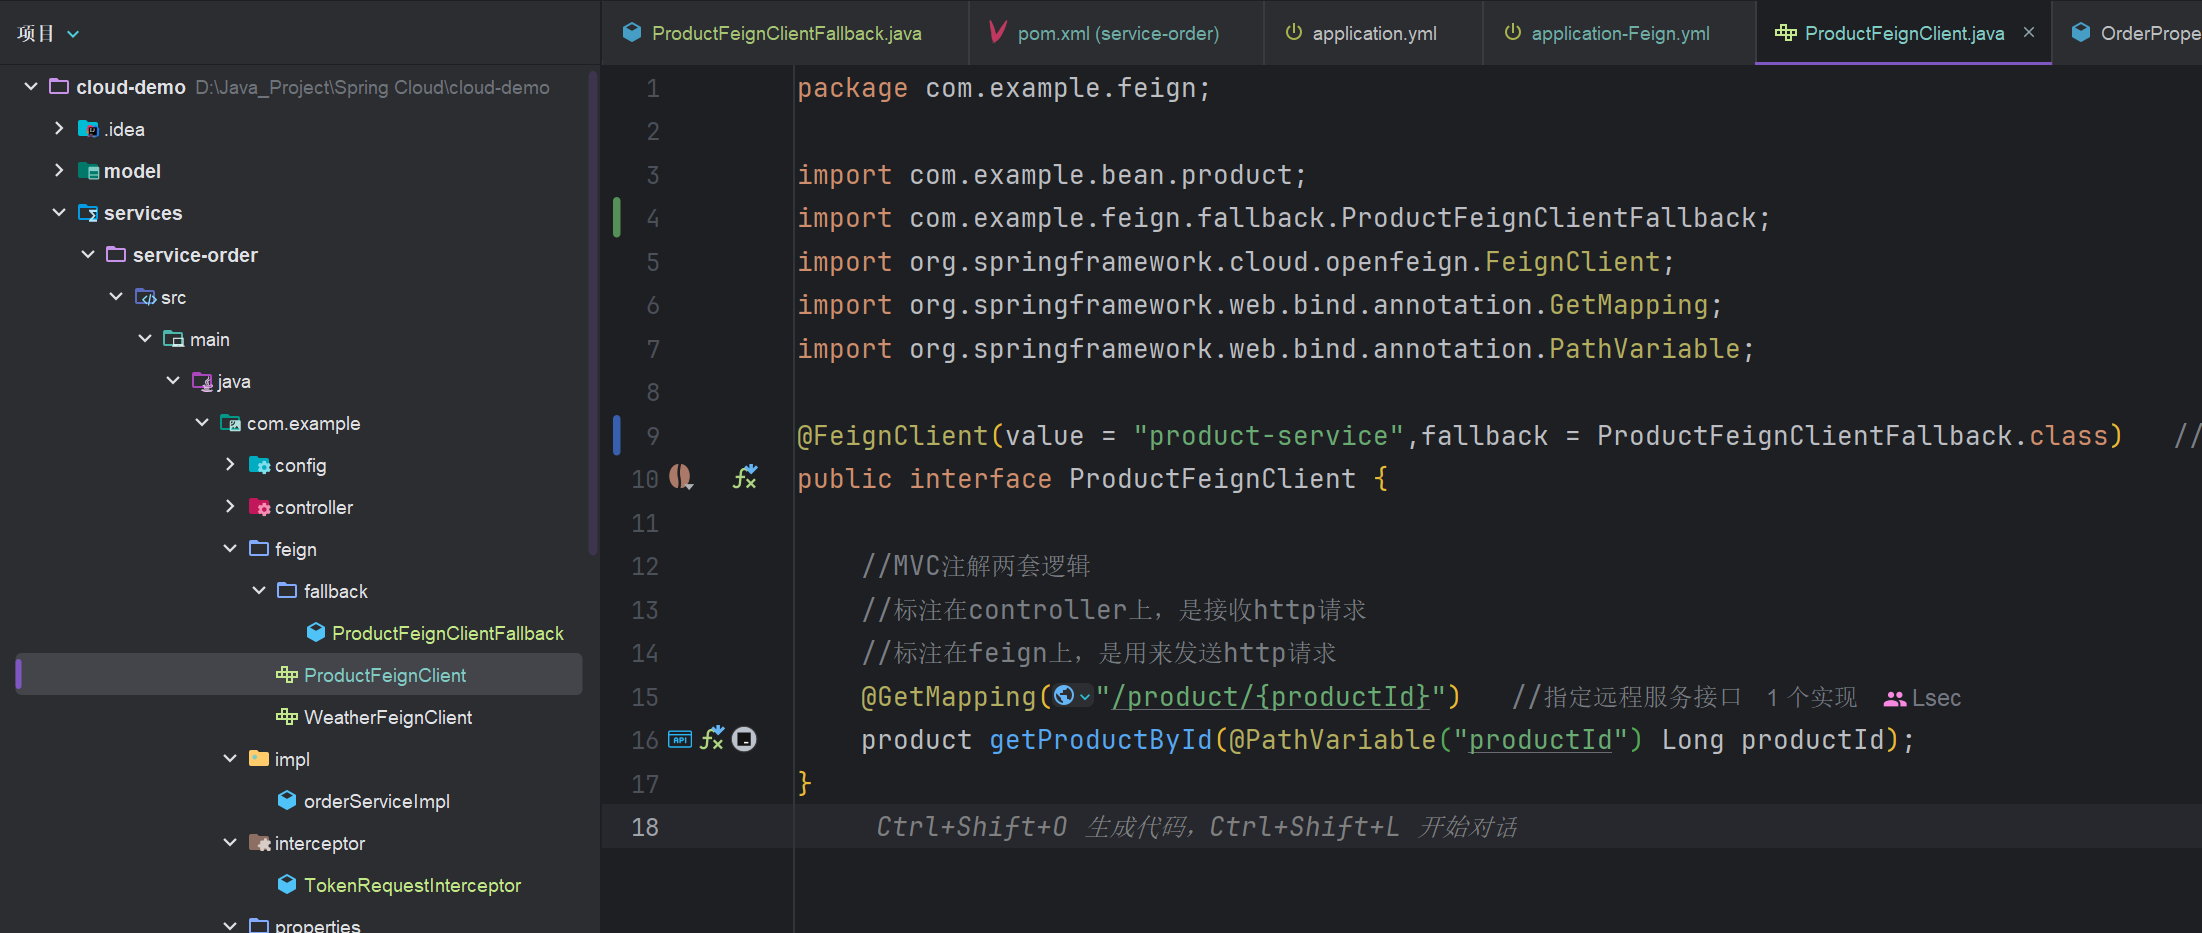
package com.example.feign;
import com.example.bean.product;
import org.springframework.cloud.openfeign.FeignClient;
import org.springframework.web.bind.annotation.GetMapping;
import org.springframework.web.bind.annotation.PathVariable;
@FeignClient(value = "product-service") //Feignт«бТѕиуФ»№╝їТїЄт«џУдЂУ»иТ▒ѓуџёТюЇтіАтљЇуД░
public interface ProductFeignClient {
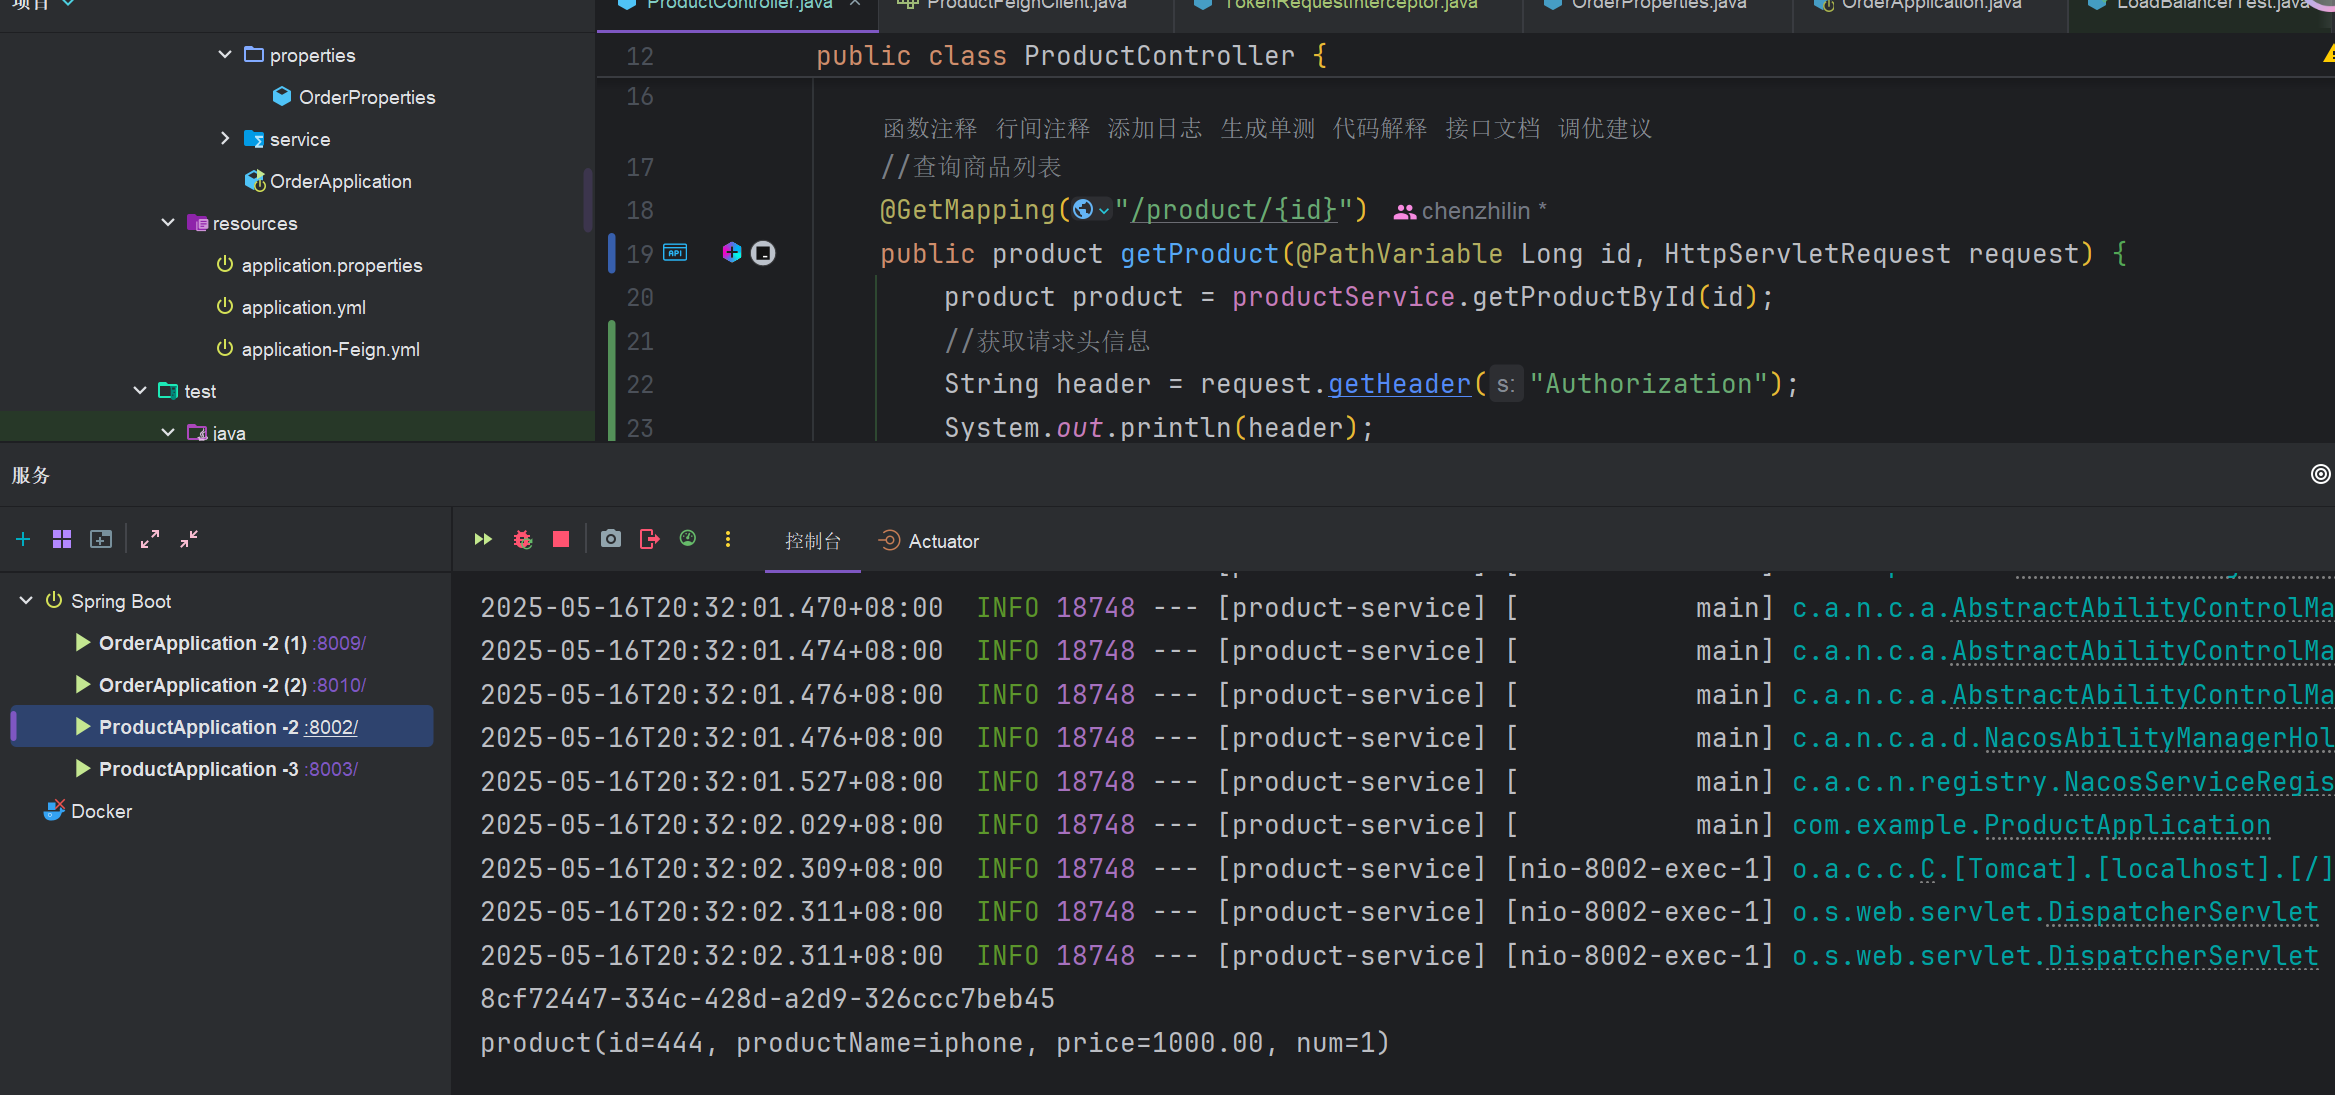
//MVCТ│еУДБСИцтЦЌжђ╗УЙЉ
//ТаЄТ│етюеcontrollerСИі№╝їТў»ТјЦТћХhttpУ»иТ▒ѓ
//ТаЄТ│етюеfeignСИі№╝їТў»ућеТЮЦтЈЉжђЂhttpУ»иТ▒ѓ
@GetMapping("/product/{productId}") //ТїЄт«џУ┐юуеІТюЇтіАТјЦтЈБ
product getProductById(@PathVariable("productId") Long productId);
}
|
т░єProductFeignClientУ┐ЏУАїСЙЮУхќТ│етЁЦ
 1
 2
 3
 4
 5
 6
 7
 8
 9
10
11
12
13
14
15
16
17
18
19
20
|
@Autowired
ProductFeignClient productFeignClient;
@Override
public order CreateOrder(Long userId, Long productId) {
order order = new order();
//У░ЃућеТјЦтЈБуџёТќ╣Т│ЋтЈЉжђЂУ»иТ▒ѓ
product product = productFeignClient.getProductById(productId);
//СИЇжюђУдЂУЄфти▒тюетєЎgetProductFromRemote2Тќ╣Т│Ћ
//product product = getProductFromRemote2(productId);
order.setId(1L);
//У«Ау«ЌУ«бтЇЋТђ╗жЄЉжбЮ
order.setTotalAmount(product.getPrice().multiply(new BigDecimal("10")));
order.setUserId(userId);
order.setNikeName("zhangsan");
order.setAddress("beijing");
//У┐юуеІТЪЦУ»бтЋєтЊЂС┐АТЂ»№╝їт╣ХУ«Йуй«тѕ░У«бтЇЋСИГ
order.setProductList(Arrays.asList(product));
return order;
}
|
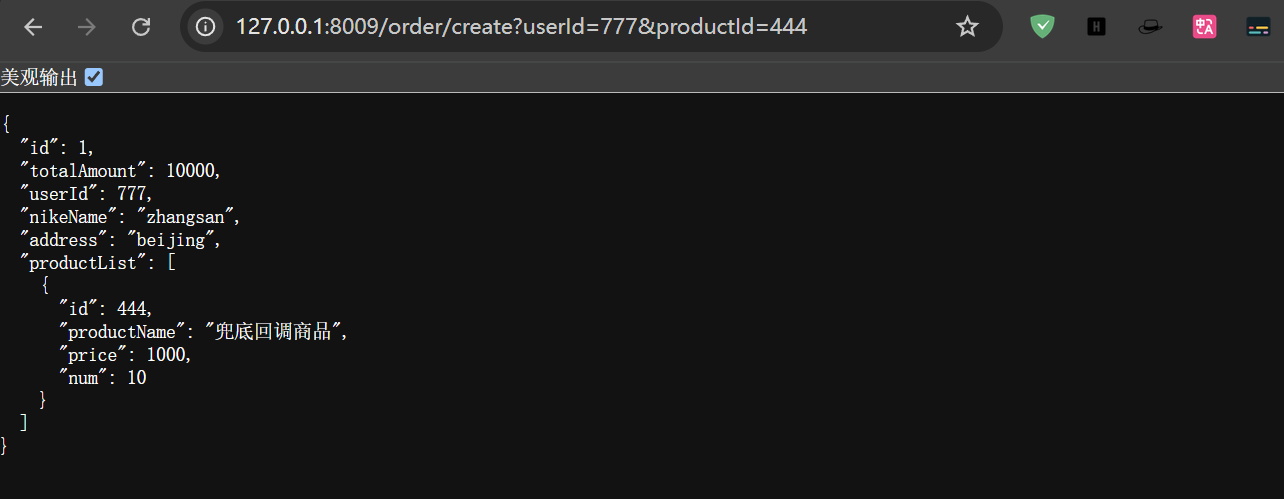
уггСИЅТќ╣APIУ┐юуеІУ░Ѓуће
Т»ћтдѓТѕЉСИЇжюђУдЂтЃЈТ│етєїСИГт┐ЃтЈЉУ»иТ▒ѓ№╝їТѕЉТЃ│тЃЈуггСИЅТќ╣APIтЈЉжђЂУ»иТ▒ѓ№╝їтдѓ№╝џтбеУ┐╣тцЕТ░ћуГЅуГЅ
Сй┐ућеFeignClientу╗Љт«џуггСИЅТќ╣APIуџёURL№╝їТа╣ТЇ«т»╣т║ћУ»иТ▒ѓТќ╣Т│ЋтЈЉжђЂт»╣т║ћУ»иТ▒ѓ
 1
 2
 3
 4
 5
 6
 7
 8
 9
10
11
12
13
14
15
|
package com.example.feign;

import org.springframework.cloud.openfeign.FeignClient;
import org.springframework.web.bind.annotation.GetMapping;
import org.springframework.web.bind.annotation.RequestParam;

//https://v.api.aa1.cn/api/api-tianqi-3/index.php?msg=%E5%A4%A9%E6%B4%A5&type=1
@FeignClient(value = "weather",url = "https://v.api.aa1.cn/api/api-tianqi-3/index.php")
public interface WeatherFeignClient {

    @GetMapping("/api/api-tianqi-3/index.php")
    String getWeather(@RequestParam("msg") String msg,
                    @RequestParam("type") String type);

}
|
 1
 2
 3
 4
 5
 6
 7
 8
 9
10
11
12
13
14
15
16
17
18
19
|
package com.example;
import com.example.feign.WeatherFeignClient;
import org.junit.jupiter.api.Test;
import org.springframework.beans.factory.annotation.Autowired;
import org.springframework.boot.test.context.SpringBootTest;
@SpringBootTest
public class WeatherTest {
@Autowired
WeatherFeignClient weatherFeignClient;
@Test
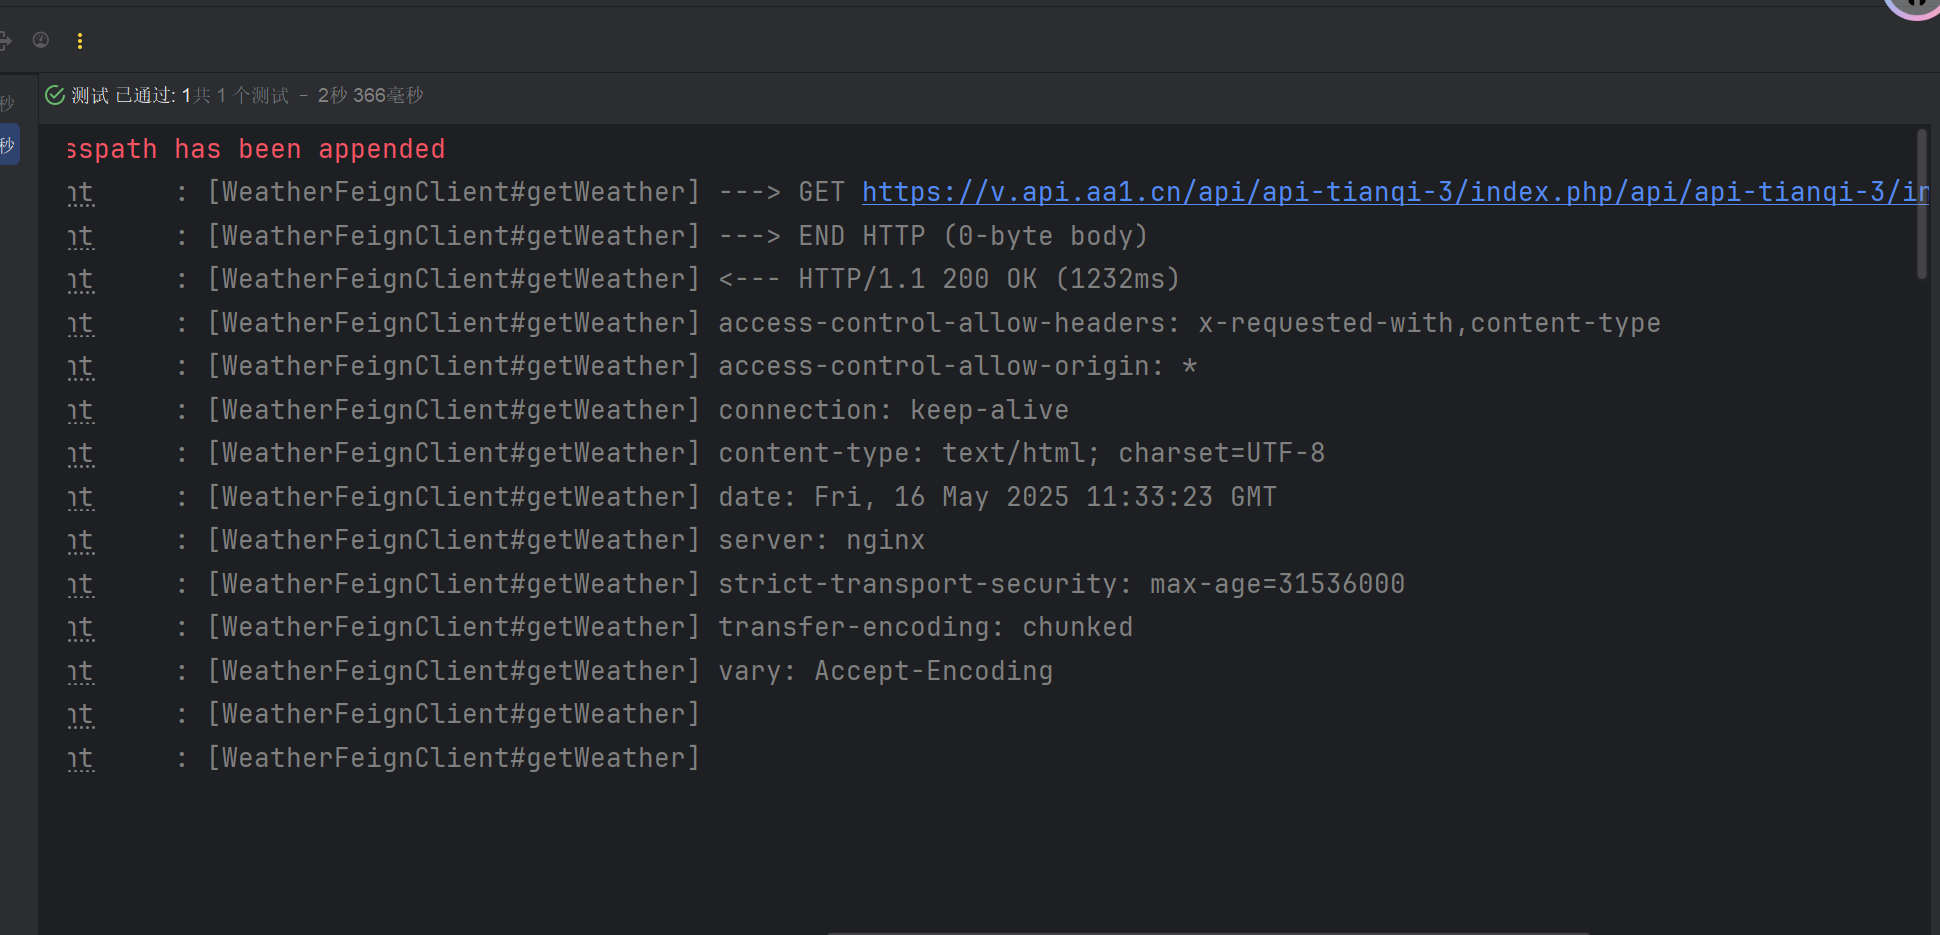
void test(){
String weather = weatherFeignClient.getWeather("тїЌС║г", "1");
System.out.println(weather);
}
}
|
т«бТѕиуФ»У┤ЪУййтЮЄУААСИјТюЇтіАуФ»У┤ЪУййтЮЄУАА№╝Ъ
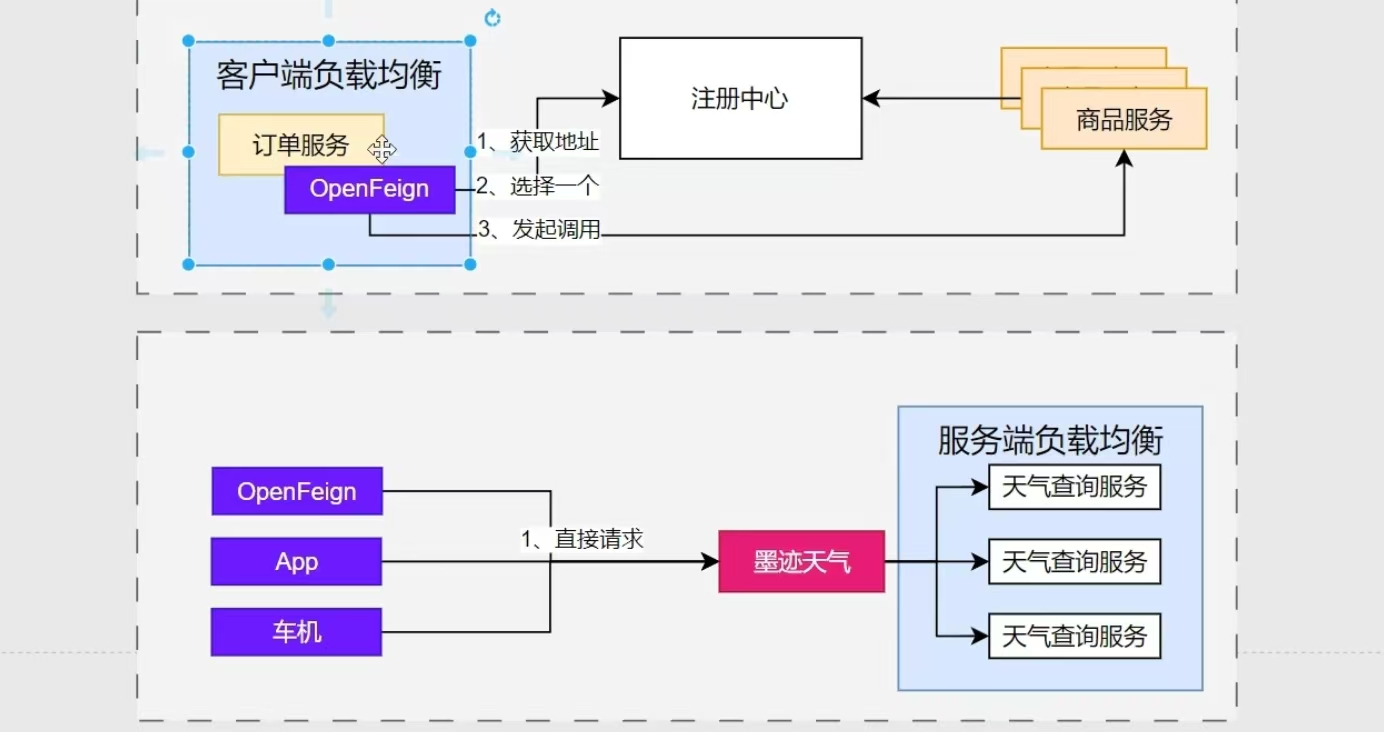
OpenFeignУ┐ЏжўХжЁЇуй«
т╝ђтљ»У»иТ▒ѓТЌЦт┐ЌтіЪУЃй
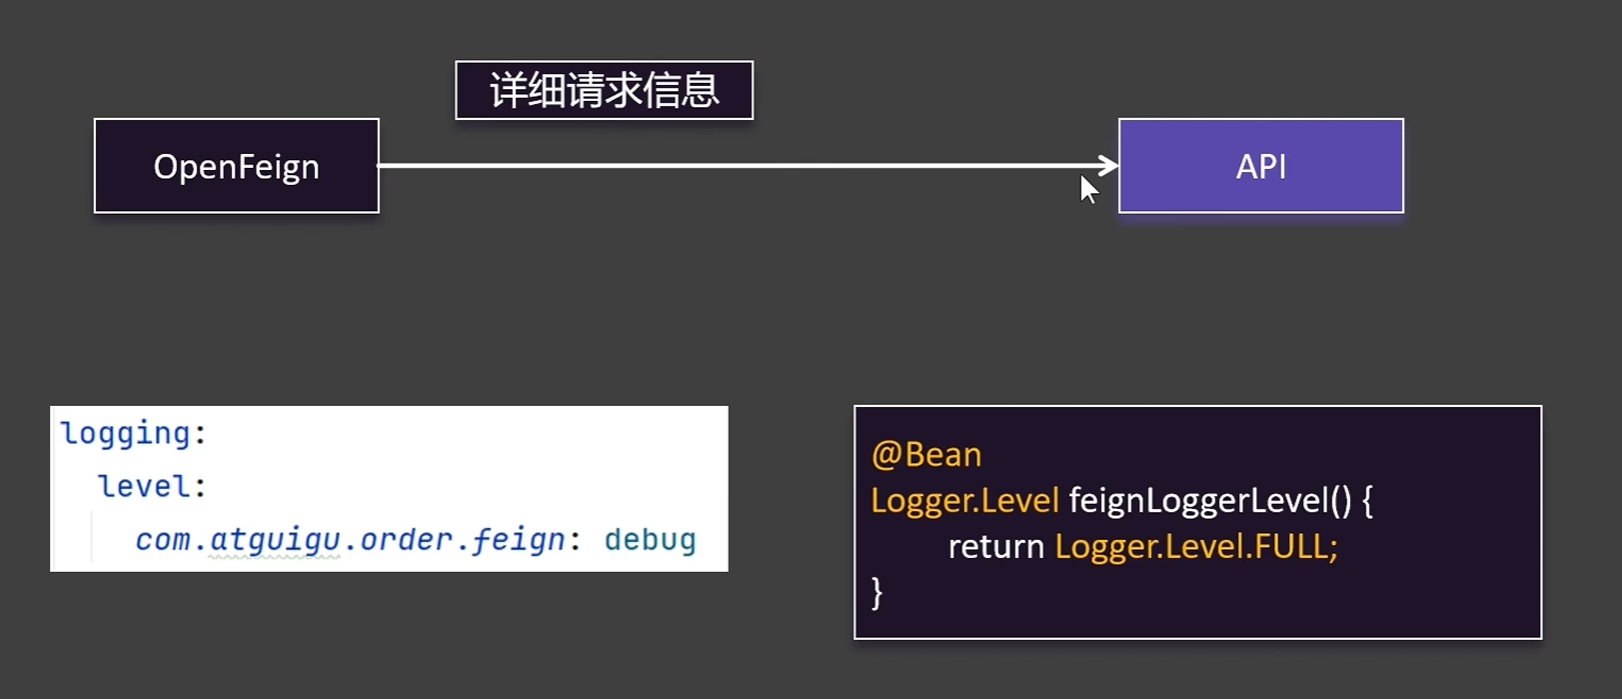
тюеymlжЁЇуй«ТќЄС╗ХСИГжЁЇуй«ТЌЦт┐ЌуџёУїЃтЏ┤
1
2
3
|
logging:
  level:
    com.example.feign: debug
|
тюеconfigжЁЇуй«у▒╗СИГжЁЇуй«СИђСИфBean
1
2
3
4
|
    @Bean
    Logger.Level feignLoggerLevel() {
        return Logger.Level.FULL;
    }
|
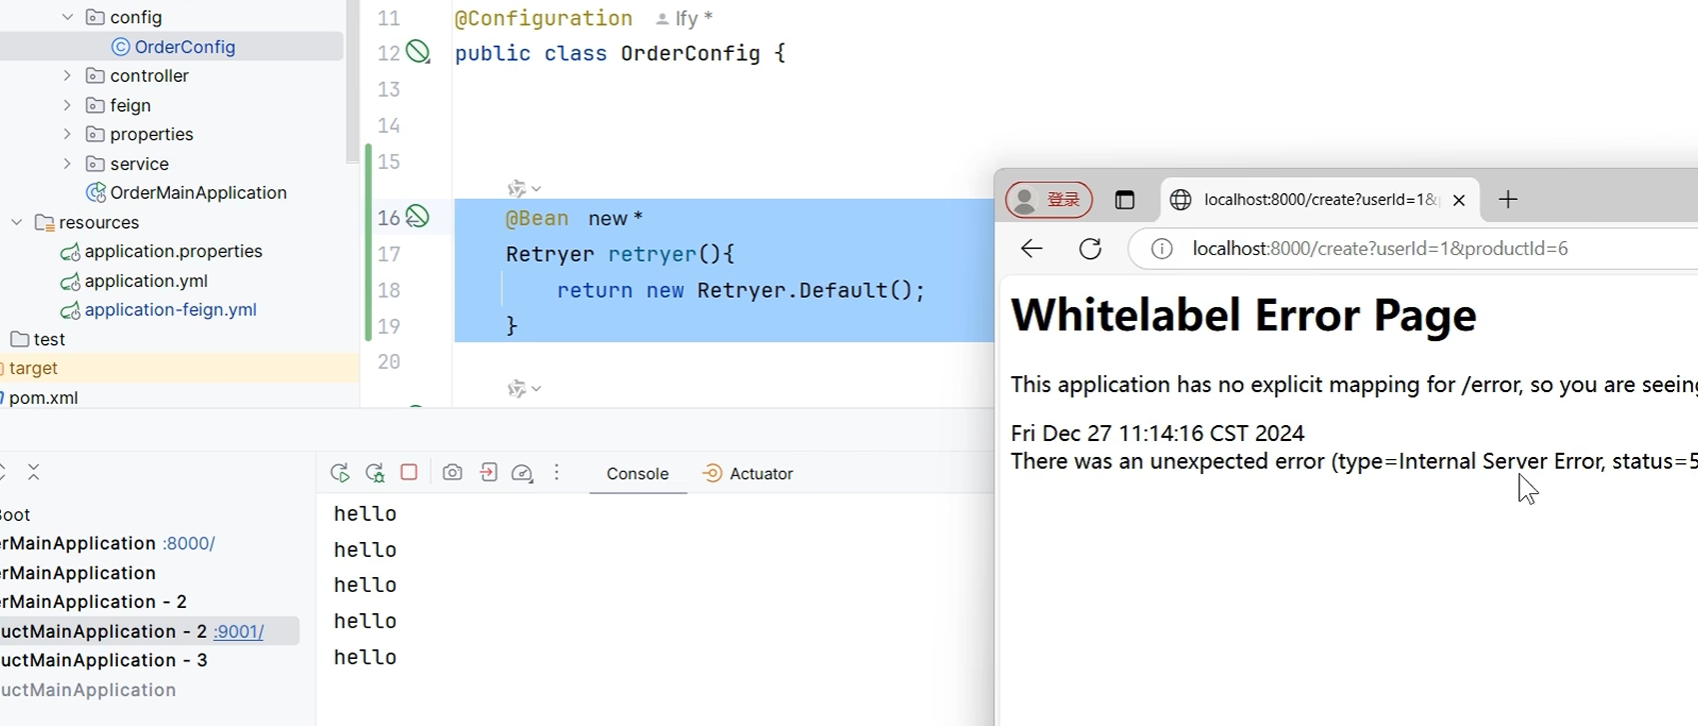
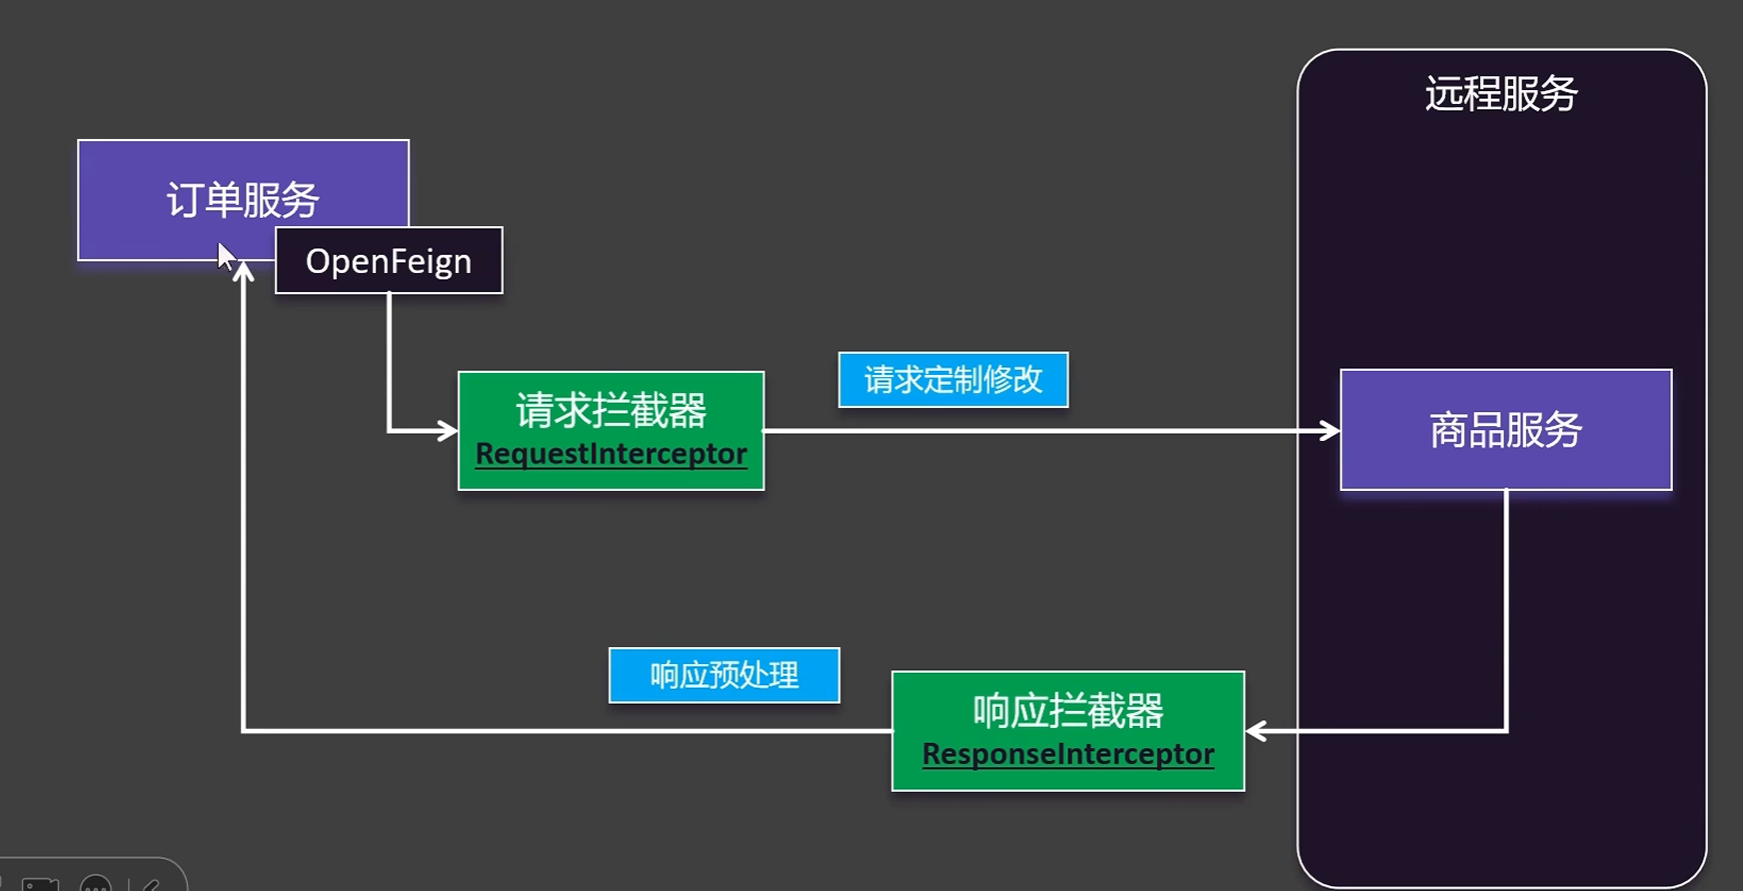
тєЇТгАУ┐љУАїТхІУ»Ћу▒╗№╝їУ»иТ▒ѓуџёУ»ду╗єС┐АТЂ»№╝ѕУ»иТ▒ѓТќ╣Т│Ћ№╝їУи»тЙё№╝їтЈѓТЋ░жЃйС╝џт▒Ћуц║№╝Ѕ
УХЁТЌХТјДтѕХ
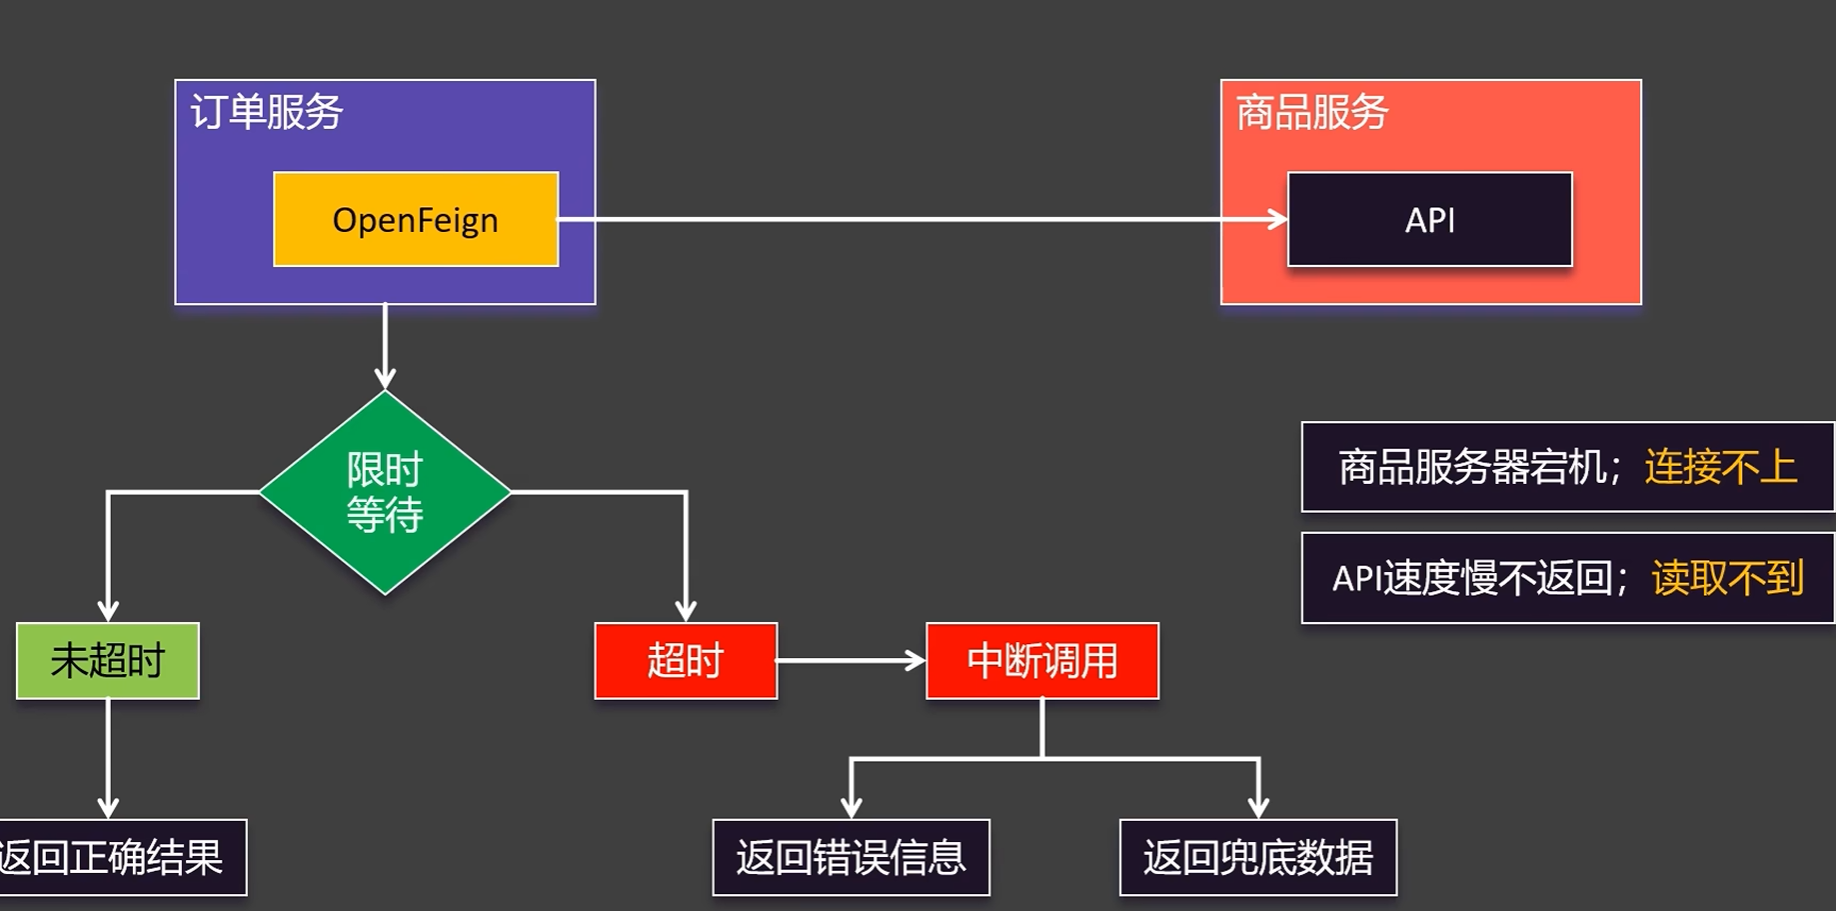
УХЁТЌХТюЅСИцуДЇУХЁТЌХ№╝їУ┐ъТјЦУХЁТЌХ№╝ѕж╗ўУ«ц10уДњ№╝ЅтњїУ»╗тЈќУХЁТЌХ№╝ѕж╗ўУ«ц60уДњ№╝Ѕ
тЈ»С╗ЦТќ░тѕЏт╗║СИђСИфжЁЇуй«ТќЄС╗Х№╝їтдѓТъютЁХт«ЃжЁЇуй«ТќЄС╗ХТЃ│УдЂСй┐ућеУ┐ЎСИфжЁЇуй«ТќЄС╗ХуџёУ»ЮтЈфжюђУдЂт╝ЋућетЇ│тЈ»
 1
 2
 3
 4
 5
 6
 7
 8
 9
10
11
12
13
|
spring:
cloud:
openfeign:
client:
config:
product-service: # тЈфжњѕт»╣product-serviceТюЇтіАуџёжЁЇуй«
connect-timeout: 10000 # У┐ъТјЦУХЁТЌХТЌХжЌ┤
read-timeout: 10000 # У»╗тЈќУХЁТЌХТЌХжЌ┤
logger-level: full # ТЌЦт┐Ќу║ДтѕФ
default: # ТЅђТюЅтЁХт«ЃТюЇтіАуџёж╗ўУ«цжЁЇуй«
connect-timeout: 20000 # У┐ъТјЦУХЁТЌХТЌХжЌ┤
read-timeout: 30000 # У»╗тЈќУХЁТЌХТЌХжЌ┤
logger-level: full # ТЌЦт┐Ќу║ДтѕФ
|
жЄЇУ»ЋТю║тѕХ
тюеconfigжЁЇуй«у▒╗СИГУЄфт«џС╣ЅСИђСИфжЄЇУ»ЋтЎеretryer№╝їSpringТЈљСЙЏж╗ўУ«цуџёretryer№╝їж╗ўУ«цТюђтцДжЄЇУ»Ћ5ТгА№╝їТ»ЈТгАТюђтцДжЌ┤жџћ1уДњ
1
2
3
4
5
|
@Bean
Retryer retryer() {
//ТюђтцџжЄЇУ»Ћ3ТгА№╝їТ»ЈТгАТюђтцДжЌ┤жџћ10уДњ№╝їТюђт░ЈжЌ┤жџћ1уДњ
return new Retryer.Default(1000, 10000, 3);
}
|
ТІдТѕфтЎе
тѕЏт╗║тЦйтљјтЈ»С╗Цт░єУ┐ЎСИфТІдТѕфтЎетюежЁЇуй«ТќЄС╗ХСИГтБ░ТўјС╣ЪтЈ»С╗Цт░єт«ЃУ«Йуй«СИ║Bean№╝їУЄфтіеУ░ЃућеТІдТѕф
 1
 2
 3
 4
 5
 6
 7
 8
 9
10
11
12
13
14
15
16
17
18
19
20
21
22
23
24
|
package com.example.interceptor;
import feign.RequestInterceptor;
import feign.RequestTemplate;
import org.springframework.stereotype.Component;
import java.util.UUID;
@Component
public class TokenRequestInterceptor implements RequestInterceptor {
/*
* У»иТ▒ѓТІдТѕфтЎежюђУдЂт«ъуј░RequestInterceptorТјЦтЈБуџёapplyТќ╣Т│Ћ
* У»ЦТќ╣Т│ЋС╝џтюеУ»иТ▒ѓтЈЉжђЂС╣ІтЅЇУбФУ░Ѓуће
* тЈ»С╗ЦтюеУ»ЦТќ╣Т│ЋСИГТи╗тіаУ»иТ▒ѓтц┤сђЂУ»иТ▒ѓтЈѓТЋ░уГЅ
* У┐ЎжЄїТѕЉС╗гтЈ»С╗ЦжђџУ┐ЄRequestTemplateт»╣У▒АТЮЦТи╗тіаУ»иТ▒ѓтц┤
* СЙІтдѓ№╝џrequestTemplate.header("Authorization", "Bearer " + token);
* */
@Override
public void apply(RequestTemplate requestTemplate) {
System.out.println("ТІдТѕфтЎеТЅДУАїС║є");
requestTemplate.header("Authorization", UUID.randomUUID().toString());
}
}
|
FallbackтЁют║ЋУ┐ћтЏъ
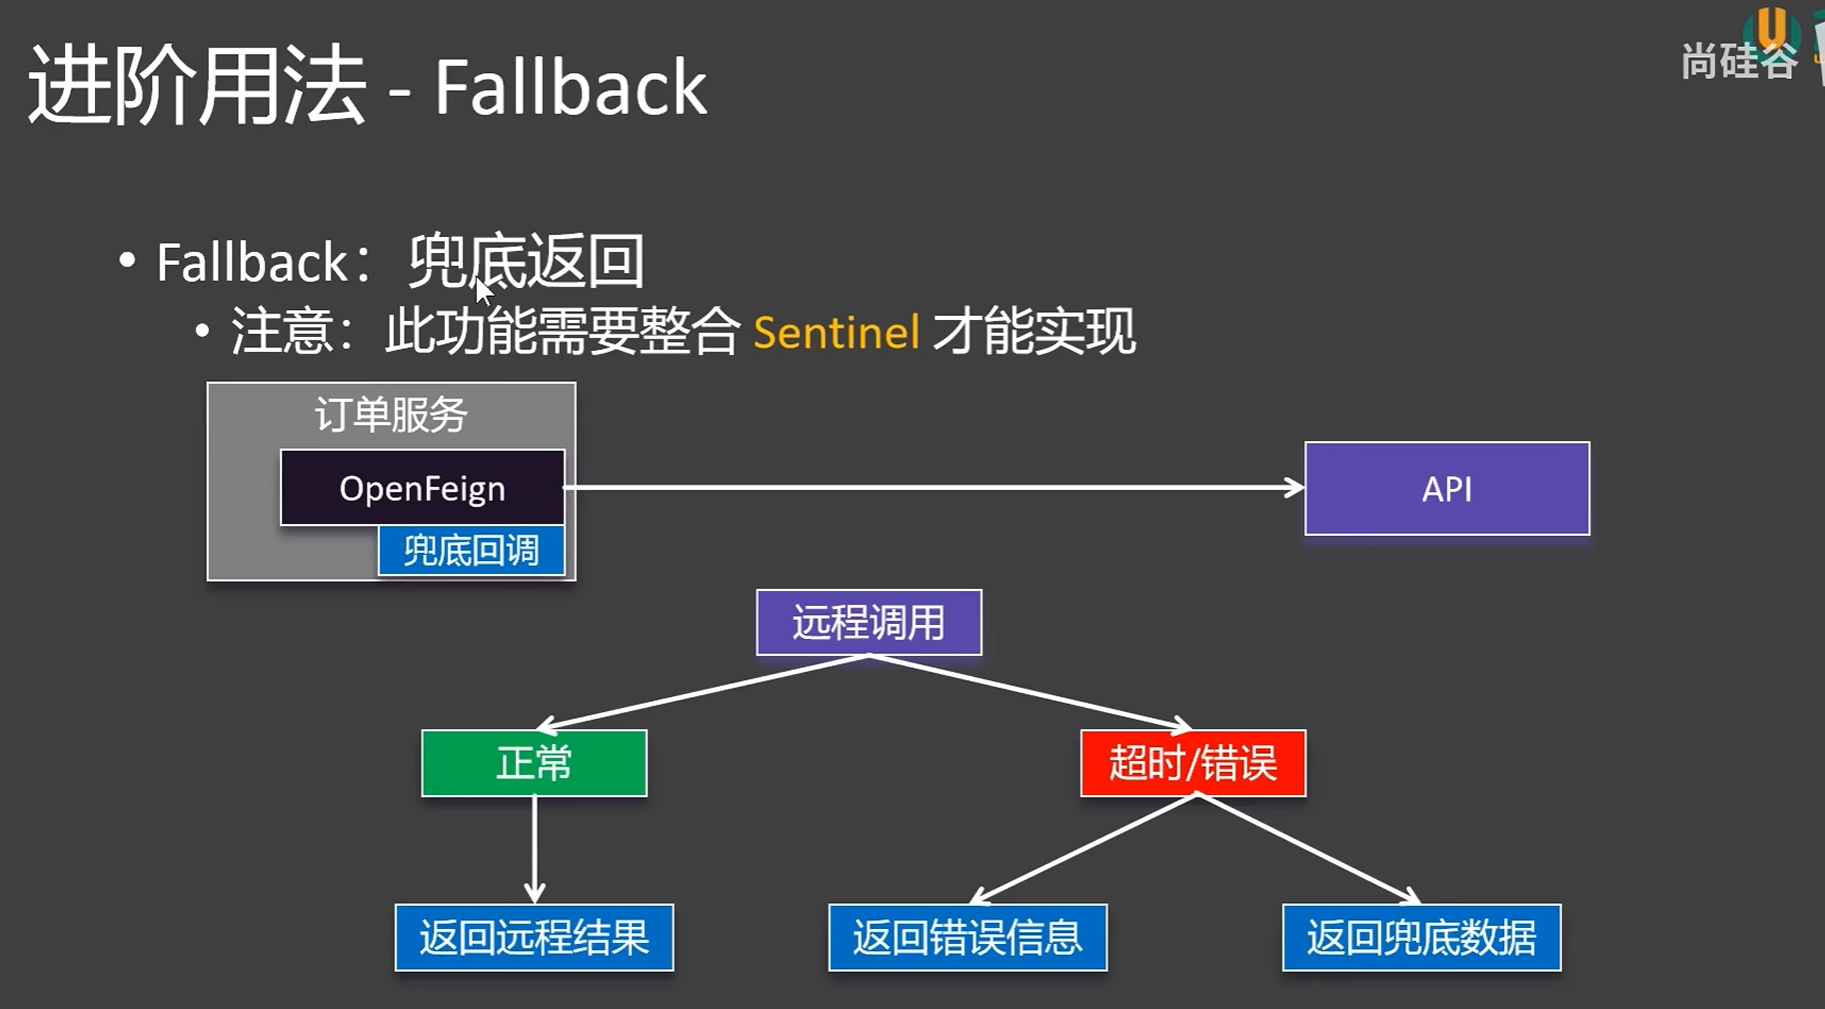
Сй┐ућеFallbackтЁют║ЋУ┐ћтЏъТю║тѕХжюђУдЂт╝ЋтЁЦsentinelСЙЮУхќ
1
2
3
4
|
        <dependency>
            <groupId>com.alibaba.cloud</groupId>
            <artifactId>spring-cloud-starter-alibaba-sentinel</artifactId>
        </dependency>
|
тюежЁЇуй«ТќЄС╗ХСИГт░єfeign.sentinel.enableУ«Йуй«СИ║true
1
2
3
|
feign:
sentinel:
enabled: true # т╝ђтљ»feignт»╣sentinelуџёТћ»ТїЂ
|
 1
 2
 3
 4
 5
 6
 7
 8
 9
10
11
12
13
14
15
16
17
18
19
20
21
|
package com.example.feign.fallback;
import com.example.bean.product;
import com.example.feign.ProductFeignClient;
import org.springframework.stereotype.Component;
import java.math.BigDecimal;
@Component
public class ProductFeignClientFallback implements ProductFeignClient {
@Override
public product getProductById(Long productId) {
System.out.println("тЁют║ЋтЏъУ░Ѓ");
product product = new product();
product.setId(productId);
product.setProductName("тЁют║ЋтЏъУ░ЃтЋєтЊЂ");
product.setPrice(new BigDecimal("1000.00"));
product.setNum(10);
return product;
}
}
|
тдѓТъюТГБтИИУ»иТ▒ѓТЌаТ│Ћт«їТѕљУ»иТ▒ѓ№╝їжѓБС╣ѕС╝џУх░тЁют║ЋтЏъУ░ЃТќ╣Т│Ћ№╝їУ┐ћтЏъж╗ўУ«цТЋ░ТЇ«